I immediately decided that my costume was going to be that of an X Wing Fighter Pilot, i.e. the orange jumpsuit get-up that Luke Skywalker and the other rebels wear when they are flying the X-Wings. My mum was also going to Secret Cinema with me, so everything I made I had to make two of!
 |
| Luke Skywalker in his X Wing Fighter Pilot Uniform |
The orange jumpsuit was simply bought off amazon for about £8. It is one of those "prisoner" ones so has some black writing on the front and black, but luckily this was going to be covered up.
The next step was the white vest. Now I wasn't completely faithful here, as in the film the vests are ruched horizontally. Instead I bought a white vest top from New Look and cut off the sleeves.
To make the pack on the front I used a cardboard box (teabags to be precise), covered in white paper and then used felt tip pens to colours in the front, copying the image of Luke. I then used black masking tape to create the straps to go around the neck, and one to go around my waist.
To make the grey straps/harness around Luke's waist and legs I used grey gaffer tape, stuck to itself. This was a bit fiddly as it kept sticking to itself, but with enough perseverance you can do it eventually! One long piece is required to go around the hips. Two shorter pieces are required to go around each leg, just above the knee. These are attached together with a short piece, which is then attached by two straps to the waist piece. One of these hangs down from the front and one from the back. These length of these pieces depends on the size/height of the person obviously so doing this on the person (or in front of a mirror) is essential to make sure it's the right size for them.
 |
| 2 hoops for the legs, with the straps that attach to the waist strap |
Now for the bit that took the longest by far (a good two days!) THE HELMET. Despite it taking hours to create it was by far the most satisfying as I got a LOAD of compliments at Secret Cinema, a ton of people saying they were the best helmets, really accurate, generally loving them!
The next part was adding the central partition on the helmet. Again this was just a piece of cardboard cut to size and covered with white paper, then glued onto the helmet. Unfortunately the cardboard I had wasn't *quite* long enough, so my central partition was in two parts.
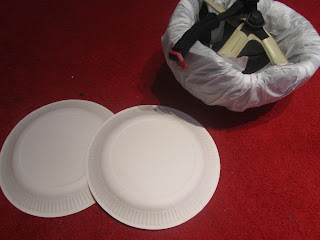
I used my skiing helmet as a base, covering it with a white plastic bin bag, using white masking tape to secure it all.
Next was the attachment of paper plates. These was actually Very Hungry Caterpillar ones which I turned inside out. I glued one to each side of the helmet with superglue, with a third across the back with the bottom cut off. The glue wasn't the best and I did have to use some more masking tape to really hold the plates in place. The whole thing would probably work better with a glue gun (which I do not own! Maybe the next thing to invest in).
Now the fun bit, the colouring in! This was just a matter of copying from the image. The front of the central partition has diagonal yellow stripes. The partition has three red stripes continuing over the helmet to the back. From about half way back the red continues outwards with a yellow strip in the middle.
The side of the helmet is a bit harder to describe, so here is a picture. I added on the Rebel Alliance signs by cutting out another piece of paper and colouring it in, rather than colouring on the white plastic as the felt tip pens didn't really work that well on the material.
The final part of the helmet was the visor. I used a clear yellow plastic wallet, and cut out a goggle shape, and attached to the helmet with sellotape.
And here's the finished product!!!
The actual event was brilliant, but I obviously can't give anything away as it's currently still on!


No comments:
Post a Comment